- Home
- Products
- Articles
- 4 Axis Robot Arm
- A Stepper Motor Driven Ferris Wheel (Version 3 Compiler required)
- An Update on Keith Cameron's Lift
- Automatic Tram Layout
- Bug in Increment Word Instruction
- Compiler Version Releases
- Industrial Arc Welding Robot
- MotorVating the Speed Play Robot
- Reproducing the Electronic Set Models
- Sensor Expansion Port Pinout Diagram
- Sheet 1 - Hardware from NZ 240 volt wall socket to...
- Sheet 3 Meccano Car model controlled by the MotorVator and Director.
- Sheet 2 - Hardware from Motor(s) to MotorVator®.
- User Input Options
- Version 3 Manual Released
- 16/32 Bit Maths Routines
- Build Your Own Photo Sensor
- Controlling Stepper Motors
- Magnetic reed switch as a non contact sensor
- MeccCompiler III Tutorial
- More Inputs and/or Motors: Port Replication
- More Inputs: the Sensor Expansion Port
- Square Root Function
- Tutorial: Rev Counter
- Use of the opto switch or opto interrupter as a ro...
- FAQ
Sheet 3 – Meccano Car model controlled by the MotorVator® and Director.
MotorVator® Group For Absolute Dummies (MGFAD).
Dummies and proud of it!!
Sheet 3 – Meccano Car model controlled by the MotorVator® and Director.
Version 1.0, 1 May 2005.
Reminder – You must have completed the work laid out in Sheets 1 and 2 and now have two Motors which you can turn on and off from the Director through the MotorVator®.
1 - Action – Build this very simple Meccano Car, bolt on Motor ‘A’, and use the Director to remotely control the backwards and forwards movement of the Meccano Car.
1 x 5-1/2“ x 2-1/2“ Flanged Plate, 2 x 4-1/2“ Axle Rods, 4 x 1†Pulley Wheels with Boss, 2 x 1/2“ Pulleys with Boss, 1 x Trunnion, 1 x Driving or Rubber Band, and Motor ‘A’.
Explanation – This is your testbed for getting the Motor to go and for you to learn the movements of the Director. Always hold the Meccano Car up in the air for the very first test. If the ‘Air’ test is ok, then run the Meccano Car on the ground.
Picture – 6447 Car and Motor ‘A’.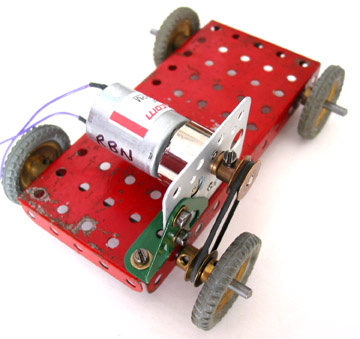
2 – Action – Use the same Meccano Car again and mount another Trunnion, 2 x 1/2“ Pulleys with Boss, Driving or Rubber Band and Motor ‘B’. You will now have two Motors (A and B) on the Meccano Car. Hold the Meccano Car up in the air. Now drive the Meccano Car using the Director.
Explanation – Practice and explore and see what happens when you move the left toggle lever to the compass points North, South, East and West; Then compass points NE, SE, SW and NW. Six of the eight positions should have the two motors pulling against each other and little movement from the Meccano Car. The other two positions should have the two motors moving as a team to move the Meccano Car backwards and forwards. Enjoy!!
Picture – 6449 Car and Motors ‘A’ and ‘B’.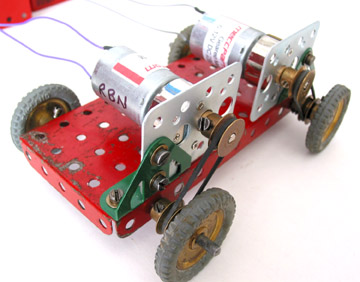
3 – Further explanation – Because you can drive two motors at the same time by using the toggle at NE, SE, SW, and NW , the amps (alias amperage) being pulled from the transformer is getting near the limit of 1 amp. If the Motors are stalled, the amperage goes even higher and possibly over the limit for which the transformer is rated causing burnout of the transformer. This is the reason that a drive band or rubber band or slipping clutch MUST be part of every Motor drive into your models.